
Another great year. It was definitely on the cold side but the wind was really still for the first couple hours which made for some great f...
Halloween 2017 is a wrap!
Another great year. It was definitely on the cold side but the wind was really still for the first couple hours which made for some great fog. Nothing new was added this year - I'm on an every other year cycle for building new props so new stuff to come in 2018. Probably between 300-400 Trick or Treaters this year with a few really creative costumes.


Halloween 2016 is a wrap!

The last trick or treater was a lone cowboy, complete with spurs, that clinked his way down the street claiming his candy loot - seemed a fitting end to the evening.
Top costumes this year was no contest - Football players dominated for boys and some variation of Zombie (nerd, nurse, princess, etc) for girls. Around 300 trick or treaters came to visit - about the same as last year.
After a hefty rain and wind storm on Sunday, Halloween setup was off to a soggy start but in the end it all came together. There was some...
New Project = Mausoleum!
After a failed due diligence mission to create an endless illusion in the hearse, we changed directions and went on to create a mausoleum!
The mausoleum needed to big enough to look impressive but small enough to overcome the always problematic storage situation. The idea then is to make it in sections of XPS foam that can come apart and stack easily for storage.
Step 1. Cut sheets of XPS foam (pink sheets) to form four walls. The edges of each side are cut into staggered keys so the whole thing can fit together with friction (didn't ultimately workout and some additional fasteners were needed). A projector was used to display an arch that was then traced on to the foam for the doorway.


Step 2. Add detail. A couple tricks at work here, the first is to stipple the foam by using a spray bottle of water followed by a pass with a heat gun. For the roof panels, a soldering iron was used to create a wood graining pattern. A router and hot knife were used to create mortar joints and general shaping. Some smaller chunks of phone were used to create trim and give the panels some more body. The rest is just improvisation with the random bits found in your garage, which in this case was a pool noodle, a bucket lid and some skulls cut in half.


Step 3. The mausoleum needs something interesting in it. How about a fountain? Stack a bunch of leftover foam pieces together and then carve away.


Step 4. Paint. Hours and hours of detailed faux painting with a quality brush and steady hand is an absolute necessity. I hope you went to art school, if you didn't, then don't bother with this step. Just kidding. When it comes to Halloween painting, precision goes out the window. The technique here is simple, prime everything then come black with a watered down black paint to get in all the cracks, then wipe off the excess black on the top with a wet rag. Finish off with some skull sconces to match the columns, a gate and some lighting. Job done.


After a failed due diligence mission to create an endless illusion in the hearse, we changed directions and went on to create a mausoleum! ...
Something new ???
What's new this year? Working on anything new? Are you building anything?
Well there, inquisitive mortal, perhaps the answer to those oft-asked questions can be found in this riddle:
I'm old and built for one
I have four walls but no hall
Getting inside is easier said than done
When near a haunted spirit may call


What's new this year? Working on anything new? Are you building anything? Well there, inquisitive mortal, perhaps the answer to ...
2015 - Night Photos
And here is the photographic evidence that something happened on All Hollow's Eve!


And here is the photographic evidence that something happened on All Hollow's Eve!
Halloween 2015 is a wrap!

If I'm picky the wind worked against the fog a bit and it did get a bit chilly but at least it wasn't raining or snowing! Speaking of fog, I'm going to make a tombstone for all of the fog machines that have bit the dust. Just today one of the smaller ones that was supposed to be used for the cauldron decided to give up the ghost. It did have a good 12 year run so there's that.
I'm guessing around 250 Trick or Treaters this year and I'd say hands down that Princesses took the top spot for girl's costumes and probably a two-way tie with Zombies and Ninjas for boy's costumes. Surprisingly, I didn't see as many Star Wars costumes as I thought there would be.
Favorite moment? Teenage boy dressed as a banana, slipped coming up the stairs and spilled all his candy. Can't make that stuff up.
Check back soon for pictures. See you in 2016!
Turned out to be another great year! If I'm picky the wind worked against the fog a bit and it did get a bit chilly but at least it ...
Horse Projection
TONIGHT ON 'HOW ITS MADE'...
Ever since I built the Horse Drawn Hearse it's been, well, not as horse-tastic as you'd imagine. I've seen some people make horses out of wood, foam, paper mache etc. but that sounded like a lot of work not to mention a HUGE headache to figure out how to store such a creation or engineer it to come apart. What if there is a way to have a horse without making a physical one? With the advent of inexpensive portable projectors I had an idea..
I started scouring the web for a suitable video (which there are plenty of horse videos, maybe too many) but I couldn't find anything that screamed Halloween. No bother, I'll make one, can't be too hard can it?
I am no animator but I do know my way around Photoshop. So I took a mashup of a horse and a horse skeleton, erasing to 'cut away' the skin to expose the skeleton image underneath to create the Ultimate Ghost Zombie HorseTM.
 |
| Exhibit A |
 |
| Exhibit B |
 |
| Exhibit Muahahaha |
 While a life-size static picture of a Ghost Zombie Horse was cool, it wasn't cool enough - enter Adobe After Effects! This program is used by television people to create those annoying animated overlays that interrupt your favorite TV show. I do not know my way around this program but having used other Adobe products I think I can figure this out. My first objective was to make the horse seem more alive. Using an image distortion effect called 'Bulge' I was able to make the chest cavity look like it was expanding and contracting to simulate breathing. This looked pretty good but it's cold outside during Halloween.. we should be able to see the breath vapor. Using the program's particle effects I cobbled up a vapor effect timed to when the chest bulge effect collapses. Breathing - Check. At this point we could have called it good but let's keep going.
While breathing makes the horse look more convincing, it's also not moving anywhere. We can't get too carried away with movement since we need to stay inside a confined projection space, which in this case is a garage door. Horse rearing effects and the like are out of the question. Care also has to be given to make sure a ovular black 'mask' is maintained around the horse such that there are no hard rectangular edges making it obvious that a screen is being projected. Using a 'Bend' effect we can make the horse rock back and forth like it would be doing to adjust it's balance. Only problem now is that the head isn't moving and the whole thing just looks like more of a rocking horse.. ugh this is getting complicated. Using another program effect called 'Bend It' we can actually fake articulation of the head, and we can time that effect with the exhaling and.. actually that's good enough. Last step is to add some pulsing glow effects and a glowing red eye to sell it as more ethereal. All done.
..
 Actually.. not done. Since we are playing with video wouldn't it be cool, since it's a 'Ghost' Zombie Horse and all if it were to disappear randomly? Yes, yes it would. We could just fade out the horse.. or make it disappear into a cloud of fog. Using two effects called 'Fractal Noise' and 'Turbulent Displace' fog was added. Boom.
Last touches were to add sound. Using Apple's Garage Band and sound effects sourced from freesound.org we've got some audio to go with the horse video. Here's an excerpt from the final video, hope you like it.
TONIGHT ON 'HOW ITS MADE'... Ever since I built the Horse Drawn Hearse it's been, well, not as horse-tastic as you'd imag...
Upgrades!
Last year while taking down all the decorations some microbursts of high wind knocked some props over and did some damage, including the roof of the hearse carriage which flew off and into the garage door making a good size dent. So this year involved a fair amount of repair but was also a good opportunity for some upgrades!
Columns
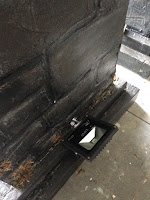
An access door was added to the back of one of the columns for something special. Also, last year there were a few Trick or Treaters that tripped over the flood lights in front of the columns so an upgrade was made to install a color-changing LED RGB fixture mounted directly to the column base with the power cord routed into the column itself to avoid that happening again. Some hot glue web webbing was added to the candle and skeleton sconce. Lastly all the holes, dings and dents from the wind damage were repaired and the columns received some more paint.


Columns
An access door was added to the back of one of the columns for something special. Also, last year there were a few Trick or Treaters that tripped over the flood lights in front of the columns so an upgrade was made to install a color-changing LED RGB fixture mounted directly to the column base with the power cord routed into the column itself to avoid that happening again. Some hot glue web webbing was added to the candle and skeleton sconce. Lastly all the holes, dings and dents from the wind damage were repaired and the columns received some more paint.


Hearse
The roof now has some bolts to secure it to the rest of the carriage to avoid flying off in a freak wind storm.
The whole of the carriage was fairly unstable due to how the rear box and the front seat are two pieces that were joined together with only two bolts and there was also a gap between the pieces caused by the front box panel trim. This was retooled such that the frame member of both the box and the seat assembly now join directly together to remove the sagging and make the whole thing more rigid. The seat box received a padded fabric seat and also the front of the box was replaced from wood with fabric. This now allows a speaker to be concealed inside the seat!
The axles were replaced with threaded black iron pipes that screw into floor flanges bolted to the wheels. This has taken out the side to side wobble and makes the hearse a bit easier to setup.
On to the rear box. I didn't like how the polyvinyl fabric used for the windows was shiny and reflected a lot of light. To make the coffin more visible it's been raised up on blocks and the 'back' side curtain has been lowered to accentuate the lighting. The window fabric from the 'front' viewing side has been removed. A skull hand was also added to the coffin along with some lighting tweaks. Finally some various mini skull accoutrements and rivets were added - can never have enough of those.


Last year while taking down all the decorations some microbursts of high wind knocked some props over and did some damage, including the roo...