Upgrades!

Last year while taking down all the decorations some microbursts of high wind knocked some props over and did some damage, including the roof of the hearse carriage which flew off and into the garage door making a good size dent.  So this year involved a fair amount of repair but was also a good opportunity for some upgrades!

Columns

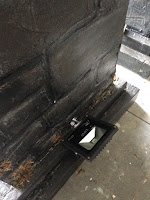
An access door was added to the back of one of the columns for something special. Also, last year there were a few Trick or Treaters that tripped over the flood lights in front of the columns so an upgrade was made to install a color-changing LED RGB fixture mounted directly to the column base with the power cord routed into the column itself to avoid that happening again.  Some hot glue web webbing was added to the candle and skeleton sconce.  Lastly all the holes, dings and dents from the wind damage were repaired and the columns received some more paint.


Hearse

The roof now has some bolts to secure it to the rest of the carriage to avoid flying off in a freak wind storm.  

The whole of the carriage was fairly unstable due to how the rear box and the front seat are two pieces that were joined together with only two bolts and there was also a gap between the pieces caused by the front box panel trim.  This was retooled such that the frame member of both the box and the seat assembly now join directly together to remove the sagging and make the whole thing more rigid.  The seat box received a padded fabric seat and also the front of the box was replaced from wood with fabric.  This now allows a speaker to be concealed inside the seat!  

The axles were replaced with threaded black iron pipes that screw into floor flanges bolted to the wheels.  This has taken out the side to side wobble and makes the hearse a bit easier to setup.

On to the rear box.  I didn't like how the polyvinyl fabric used for the windows was shiny and reflected a lot of light.  To make the coffin more visible it's been raised up on blocks and the 'back' side curtain has been lowered to accentuate the lighting.  The window fabric from the 'front' viewing side has been removed.  A skull hand was also added to the coffin along with some lighting tweaks.  Finally some various mini skull accoutrements and rivets were added - can never have enough of those.


Last year while taking down all the decorations some microbursts of high wind knocked some props over and did some damage, including the roo...

Cemetery Columns Part VI

Finished the gates to go with the columns.  These were made using PVC and 1x2 wood in the same fashion as the graveyard fence.  Here's some pictures.


Finished the gates to go with the columns.  These were made using PVC and 1x2 wood in the same fashion as the graveyard fence.  Here's s...

Cemetery Columns Part V

After the black-wash painting was complete, some lighter grey and white were added.  Some cracks were also carved into the foam and some moss hot-glued on.  Then the whole column got a coat of polycrylic to seal and waterproof.  Finally, the skeleton sconces from earlier were painted gold, then dusted with black and mounted using drywall screws.  All done with the columns, on to the gates!


After the black-wash painting was complete, some lighter grey and white were added.  Some cracks were also carved into the foam and some mos...

Cemetery Columns Part IV

Painting and more painting.  First coat is some exterior kilz primer.  Second coat is another primer tinted grey.  After the primer, the whole thing gets a watered down latex/acrylic mix of dark grey.  Before the paint is dry, a wet rag is used to remove the paint from the high spots but leave it in place in the cracks and crevices.  To give the illusion of more depth, a highlight is added by removing more paint from the top 'lip' of each 'stone' and exposing the grey paint underneath.


Painting and more painting.  First coat is some exterior kilz primer.  Second coat is another primer tinted grey.  After the primer, the who...

Cemetery Columns Part III

Some extra joint compound and some sanding done the other day to add some more definition.  These are now ready to prime for painting.  I've attached some pics too of some 'skeleton sconces' which will be placed on the front of the columns.


Some extra joint compound and some sanding done the other day to add some more definition.  These are now ready to prime for painting.  I...

Cemetery Columns Part II

Started the Cemetery columns this past weekend.  The  stone pattern was made by skim coating the column with joint compound and running my finger through it while wet to make the 'mortar joints'.  Next up is priming and then painting!


Started the Cemetery columns this past weekend.  The  stone pattern was made by skim coating the column with joint compound and running my f...

New Project - Cemetery Columns

Working on a new project this Labor Day to build out some Cemetery Columns.  I've seen many of these built but none quite having the 'gothic tomb' type of look I'm going after.

Here's the plan -- build a frame using 2x2 stock sheathed in 1/2" OSB.  Next, add some trim detail to top and bottom, with the top detail and cap using extruded foam board to save on weight.  To make the stonework I plan on covering the OSB with spackle/joint compound and then 'carve' out the mortar joints to get depth.  Then I'll seal and paint the whole thing to weather proof it and get the right aged look.

Still deciding what to put between the columns, but I'm leaning towards a gate constructed out of PVC similar in style to the existing fence.
Working on a new project this Labor Day to build out some Cemetery Columns.  I've seen many of these built but none quite having the ...